Difference between revisions of "Author Help"
| (49 intermediate revisions by 2 users not shown) | |||
| Line 1: | Line 1: | ||
| − | Dharmawiki article structure has many features that are user friendly both for the Authors as well as the Readers. | + | Dharmawiki article structure has many features that are user friendly both for the Authors as well as the Readers. Wiki software is flexible and hence the [[Article Structure|article structure]] in this site undergoing refinements as we go along. Creating and Formatting Articles is elaborated here in the further sections (More information is available in the [http://meta.wikimedia.org/wiki/Help:Contents User's Guide] for information on using the wiki software.) |
| − | + | ||
| − | + | New authors are required to familiarize themselves with the software guidelines for editing or formatting as follows: | |
| − | + | #Knowing how to begin editing | |
| − | + | #Adding text (using language keyboard) | |
| − | + | #Making existing text bold, italicized and using other formatting tools | |
| − | + | #Creating a new subsection, with correct subheading level and section content | |
| − | + | #Addition of and editing a citation (for adding references) | |
| − | + | #Making tables, column-lists and using other such features | |
| − | + | #Addition and removal of flagging templates (against a specific line as well as the whole article) | |
| − | + | #Addition and removal of an internal link (inter-linked articles within the site) | |
| − | + | #Addition and removal of an external links (linking an article to external sites) | |
| − | + | #Finalizing/saving edits | |
| − | |||
| − | |||
| − | |||
| − | |||
| − | |||
| − | |||
| − | |||
| − | |||
| − | # | ||
| − | ## | ||
| − | # | ||
| − | # | ||
| − | |||
| − | |||
== Create New Page == | == Create New Page == | ||
| Line 33: | Line 19: | ||
* [[Guidelines for Authors and Editors]] defines the content guidelines used on the site and software usage | * [[Guidelines for Authors and Editors]] defines the content guidelines used on the site and software usage | ||
* Contact a [[Dharmawiki Editor]] for any guidance during creating a new page | * Contact a [[Dharmawiki Editor]] for any guidance during creating a new page | ||
| − | A new page can be created in one of the following three ways | + | A new page can be created in one of the following three ways : |
| − | + | # From a Link | |
| − | + | # From a New Search | |
| − | + | # From a URL | |
| − | |||
| − | |||
| − | |||
| − | == From a link == | + | === From a link === |
| − | Some pages contain red links such as | + | Once logged in with their credentials, Authors may click on the [https://dharmawiki.org/index.php/Special:CreatePage Create New Page] link on the Side bar or on top of the Article next to the Discussion Page to Create a New Page with appropriate title format as defined in the standard [[Formating Guidelines]]. Once created the content can be added into the page in a simple way. |
| − | [[File:Red Link.jpg| | + | [[File:Create new page button 1.jpg|thumb| |
| + | '''Create New Page Link in Sidebar''' | ||
| + | ]] | ||
| + | [[File:Create new page button 2.jpg|thumb|'''Create New Page Link on Top of Banner'''|451x451px|center]]Some pages contain red links such as the one seen below. They are typically like place holders and prompts to other pages that don't exist yet (do not have content in them) and are generally required for completing the concepts. | ||
| + | [[File:Red Link.jpg| '''Example of a Red Link'''|frame|none]] | ||
* To create a new page from one of these click on the red link. They are typically created in preparation for leading to creation of a new page from an existing page. | * To create a new page from one of these click on the red link. They are typically created in preparation for leading to creation of a new page from an existing page. | ||
| Line 51: | Line 38: | ||
* Once a page is created from the red link, refresh the original article which led you to this page, the link becomes blue in color indicating that the page now has content. | * Once a page is created from the red link, refresh the original article which led you to this page, the link becomes blue in color indicating that the page now has content. | ||
| − | == From a New Search == | + | === From a New Search === |
| − | Another way to create a new page is when you notice a search is not returning any results of valid nature. | + | Another way to create a new page is when you notice a search is not returning any results of valid nature. The search results shows a red linked word which can be potentially created as a new page by following the steps as described above. |
| − | [[File: | + | [[File:Search_Results.JPG|none|thumb|544x544px| |
| − | '''Example of a | + | '''Example of Creating a page from Search Results''' |
]] | ]] | ||
* Type the name of the page that doesn't exist in the Search box, and start the search. | * Type the name of the page that doesn't exist in the Search box, and start the search. | ||
| − | * The search results will say that no such page exists. You can create a new page by clicking on the 'red' name. | + | * The search results will say that no such page exists. You can create a new page by clicking on the 'red linked' name. |
| − | == From | + | === From a URL === |
| − | + | [[File:Adhikara URL.png|thumb|673x673px| | |
| − | + | '''Example of entering the requested title in UR'''L | |
| − | + | ]] | |
| − | + | The third way to create a new page is by directly typing the required page (eg. Adhikara) in the URL in the address bar of the browser. It is one of the easiest ways to create a new page. You could edit that and press enter. If the typed page does not exist, you can create a new page by clicking on 'create this page' link. | |
| − | |||
| − | |||
| − | |||
| − | == | + | == New Page Vs Blank Page == |
| − | + | A 'non-existing' or a new page does not have a history, whereas a 'blank' page has a page 'history', although it does not have any content. A non-existing page is created whereas a blank page is created but has no content inside it. | |
| − | |||
* Creating a new page is just like editing a blank page. | * Creating a new page is just like editing a blank page. | ||
* To create an empty page, save a page with the wikitext __END__. This code will not be saved, it just prevents refusal by the system to create an empty page. | * To create an empty page, save a page with the wikitext __END__. This code will not be saved, it just prevents refusal by the system to create an empty page. | ||
| + | [[File:New page without history.png|thumb|500x500px| | ||
| + | '''Example of a non-existing page''' | ||
| + | |left]] | ||
| + | [[File:Blank Page 2.png|center|thumb|500x500px| | ||
| + | '''Example of Blank Page without content''' | ||
| + | ]][[File:Blank page history.png|thumb|500x500px| | ||
| + | '''Example of history of Blank Page : Date and time stamp of creation of the page''' | ||
| + | |none]] | ||
| + | == Adding Content in a New Page == | ||
| + | After a new page is created, you can add content to it by going to 'Edit' mode or 'Edit Source' mode. You can add content into a new page by just typing it out. | ||
| + | [[File:Edit button.png|thumb|500x500px| | ||
| + | '''Click on Edit button.''' | ||
| + | |left]] | ||
| + | [[File:Typing content.png|thumb|500x500px| | ||
| + | '''Start typing in the space below the title.''' | ||
| + | |center]] | ||
| + | |||
| + | [[File:Saving content.png|thumb|500x500px| | ||
| + | '''Save your work by clicking on Save Changes.''' | ||
| + | |none]] | ||
| + | |||
| + | As you can see once you start typing the Save Changes button gets activated from gray to blue. | ||
| + | * 'Edit' mode is preferred to edit text content. This tutorial guides one on making simple formatting changes from this mode. 'Edit Source' mode is a little complex and is used to edit tables, image indents, hyperlinks etc. | ||
| + | * When you have finished adding your initial text, click on 'Save page'. The new page will be created. | ||
| + | You will need internet connection to save the changes you made for the content to be uploaded and saved in the site. Always check the following before creating a new page | ||
| + | * whether a page of the same or similar title exists | ||
| + | * the content in that similar page is appropriate and relevant | ||
| + | * if the title of the page is according to the format scheme on the site. See Format Guidelines. | ||
| + | |||
| + | == Formatting Content in a Page == | ||
| + | Once you start adding content in a page by typing it out, you will need simple formatting tools to present your data clearly. An array of formatting tools open up only when you are in the edit mode. The following pictures outline the buttons used to add the various formatting styles supported by Mediawiki. | ||
| + | |||
| + | === Bullet Lists === | ||
| + | [[File:Bullet Points.png|thumb|500x500px| | ||
| + | '''To Insert Bullet Points click on the bullet list as highlighted''' | ||
| + | |none]] | ||
| + | Bullet lists helps the author present data in clear and crisp manner, in short sentences. Bullet lists cannot be indented. | ||
| + | |||
| + | === Numbered Lists === | ||
| + | [[File:Numbered list.png|none|thumb|500x500px| | ||
| + | '''To insert Numbered Lists click on the numbered list as highlighted''' | ||
| + | ]]Decreasing and increasing the indentation is possible for numbered lists | ||
| + | |||
| + | === Paragraph Style === | ||
| + | To make headings and subheadings the Paragraph tab has to be accessed. Once the words are in these formats they do not accept the bullet point and numbered lists patterns. For example, Headings cannot be in bullet points. | ||
| + | [[File:Paragraph Styles.png|none|thumb|400x400px|'''List of Paragraph Styles''']]The drop down list shows the different styles and their visibility on the page when used. Page Title cannot be used in general during the editing process within the page content. | ||
| + | |||
| + | === Text Formatting Styles === | ||
| + | Text formatting tools include the following, a small number of them, as seen in the drop down list. Mostly one would require the Bold and Italic texts for the articles on this portal (to maintain consistency uniformly). Other tools such as Underline, Subscript, Superscript are not used on the site. The font size also is to be maintained normal neither big nor small (with very rare exceptions). [[File:Text Formats.PNG|none|thumb|447x447px|'''List of Text Formatting Styles''']] | ||
| + | |||
| + | === Language === | ||
| + | While English is used widely, other languages such as Samskrit language is used for slokas, mantras and phrases as may be required. Editing content in samskrit language can be done either through the keyboard or by clicking on the following symbol and choosing the appropriate language for entering characters. At present transliteration of samskrit slokas and mantras are not facilitated by wiki software. Hence authors have to copy and paste the transliterated slokas from other softwares that offer them. | ||
| + | [[File:Symbol for Devanagari.png|none|thumb|340x340px|'''Accessing Devanagari characters''']] | ||
| + | |||
| + | === Linking of Articles === | ||
| + | A very good feature about the wiki software is the ability to connect all related topics through the interlinking feature. Articles and topics tend to become big in the process of making them comprehensive. In such instances appropriate parts of the content can be placed in new pages and referred to in other articles through interlinking. The feature is called hyperlinking and can be accessed by clicking on the highlighted sign as below | ||
| − | == | + | Once the article is linked it appears blue in color with an underline. On hovering such words a small text box having the link to the new page appears over it, indicating the title of the article. |
| − | * | + | [[File:Hyperlink 1.PNG|none|thumb|340x340px|'''Linking of within the site Articles''']] |
| − | + | ||
| − | + | === Flags and Pointers === | |
| − | + | Wiki offers another important tool to identify the content that needs expansion in various ways. We can place flags that draw the attention of the reader to | |
| − | + | * further editing of content (after an author has placed raw data) | |
| + | * for clarification of a concept (after an author has placed a perspective) | ||
| + | * addition of required references | ||
| + | * addition of more content (when comprehensiveness is required) | ||
| + | To add each template the procedure is similar and easy. Take the cursor to the top line of the page and click on the Insert button in the formatting tools. In the dropdown list select the Template button. All the names are case sensitive. | ||
| + | [[File:Flagging the Articles.png|none|thumb|471.667x471.667px|'''Use Insert and then Template to add flags and pointers''']] | ||
| + | Then add the suitable template selected from the drop-down list. Then press on the Insert button. | ||
| + | [[File:Add a template.png|none|thumb|475.955x475.955px|'''Select the appropriate template from the dropdown list''']] | ||
| + | Examples of few such templates which can be added by author discretion are as follows. [[File:Citation Flag.png|thumb|800x800px| | ||
| + | '''Flag a sentence that needs a reference''' | ||
| + | |none]] | ||
| + | [[File:Citations Needed.png|thumb|522x522px| | ||
| + | '''Template for Flagging an article that needs references. Select NeedCitation in the template list''' | ||
| + | |none]] | ||
| + | [[File:Needs Editing.png|thumb|426x426px| | ||
| + | '''Template for flagging an article that needs further refinement. Select ToBeEdited in the template list.''' | ||
| + | |none]] | ||
| + | [[File:Stub Article.png|thumb|382x382px| | ||
| + | '''Template for flagging an article that needs expansion. Select StubArticle''' '''in the template list.''' | ||
| + | |none]] | ||
| + | |||
| + | === Adding Categories === | ||
| + | Adding categories is important for two reasons | ||
| + | * to make your page visible in the readers domain | ||
| + | * to enable sorting to articles | ||
| + | [[File:Category.png|none|thumb|420x420px|'''Adding a Single or Multiple Categories''']] | ||
| + | Select the highlighted - three lines - button in the formatting panel. From the drop-down list so obtained select Categories. All the names are case sensitive as well as grammar sensitive. A new window pops up as below. Choose the appropriate category and click on Apply changes to save the category. Repeat the same step to add another category. | ||
| + | [[File:Adding a category.png|none|thumb|420x420px|'''Adding the required category''']] | ||
| + | |||
| + | == More Information == | ||
* [[Guidelines for Authors and Editors|Guidelines]] for Authors and Editors | * [[Guidelines for Authors and Editors|Guidelines]] for Authors and Editors | ||
* Content Formatting Policies | * Content Formatting Policies | ||
* Technical matters | * Technical matters | ||
[[Category:About Dharmawiki]] | [[Category:About Dharmawiki]] | ||
Latest revision as of 15:51, 12 March 2019
Dharmawiki article structure has many features that are user friendly both for the Authors as well as the Readers. Wiki software is flexible and hence the article structure in this site undergoing refinements as we go along. Creating and Formatting Articles is elaborated here in the further sections (More information is available in the User's Guide for information on using the wiki software.)
New authors are required to familiarize themselves with the software guidelines for editing or formatting as follows:
- Knowing how to begin editing
- Adding text (using language keyboard)
- Making existing text bold, italicized and using other formatting tools
- Creating a new subsection, with correct subheading level and section content
- Addition of and editing a citation (for adding references)
- Making tables, column-lists and using other such features
- Addition and removal of flagging templates (against a specific line as well as the whole article)
- Addition and removal of an internal link (inter-linked articles within the site)
- Addition and removal of an external links (linking an article to external sites)
- Finalizing/saving edits
Create New Page
A brand new author can access the links to Create a New Page only after he/she gets logged in. Authors should familiarize themselves with the following documents before attempting to create content on the site.
- Dos and Donts for a Guest Author
- Dharma Point of View which defines the Content Policies for Dharmawiki
- Guidelines for Authors and Editors defines the content guidelines used on the site and software usage
- Contact a Dharmawiki Editor for any guidance during creating a new page
A new page can be created in one of the following three ways :
- From a Link
- From a New Search
- From a URL
From a link
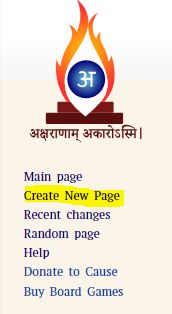
Once logged in with their credentials, Authors may click on the Create New Page link on the Side bar or on top of the Article next to the Discussion Page to Create a New Page with appropriate title format as defined in the standard Formating Guidelines. Once created the content can be added into the page in a simple way.
Some pages contain red links such as the one seen below. They are typically like place holders and prompts to other pages that don't exist yet (do not have content in them) and are generally required for completing the concepts.
- To create a new page from one of these click on the red link. They are typically created in preparation for leading to creation of a new page from an existing page.
- Check the spelling of the title and whether it is in the required format before creating the page. Make sure that the site does not contain a duplicate entry of the same page and if the content is found under another similar name page.
- If there isn't already a new page link to the page you want to create, you can always add such a link yourself. You would add the new page link typically in a related page, an index page or your own user page.
- Once a page is created from the red link, refresh the original article which led you to this page, the link becomes blue in color indicating that the page now has content.
From a New Search
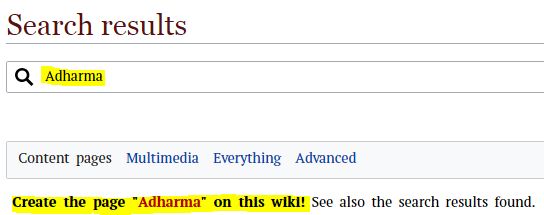
Another way to create a new page is when you notice a search is not returning any results of valid nature. The search results shows a red linked word which can be potentially created as a new page by following the steps as described above.
- Type the name of the page that doesn't exist in the Search box, and start the search.
- The search results will say that no such page exists. You can create a new page by clicking on the 'red linked' name.
From a URL
The third way to create a new page is by directly typing the required page (eg. Adhikara) in the URL in the address bar of the browser. It is one of the easiest ways to create a new page. You could edit that and press enter. If the typed page does not exist, you can create a new page by clicking on 'create this page' link.
New Page Vs Blank Page
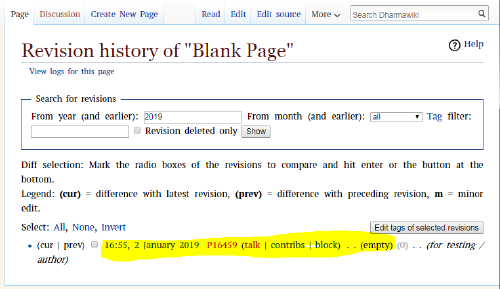
A 'non-existing' or a new page does not have a history, whereas a 'blank' page has a page 'history', although it does not have any content. A non-existing page is created whereas a blank page is created but has no content inside it.
- Creating a new page is just like editing a blank page.
- To create an empty page, save a page with the wikitext __END__. This code will not be saved, it just prevents refusal by the system to create an empty page.
Adding Content in a New Page
After a new page is created, you can add content to it by going to 'Edit' mode or 'Edit Source' mode. You can add content into a new page by just typing it out.
As you can see once you start typing the Save Changes button gets activated from gray to blue.
- 'Edit' mode is preferred to edit text content. This tutorial guides one on making simple formatting changes from this mode. 'Edit Source' mode is a little complex and is used to edit tables, image indents, hyperlinks etc.
- When you have finished adding your initial text, click on 'Save page'. The new page will be created.
You will need internet connection to save the changes you made for the content to be uploaded and saved in the site. Always check the following before creating a new page
- whether a page of the same or similar title exists
- the content in that similar page is appropriate and relevant
- if the title of the page is according to the format scheme on the site. See Format Guidelines.
Formatting Content in a Page
Once you start adding content in a page by typing it out, you will need simple formatting tools to present your data clearly. An array of formatting tools open up only when you are in the edit mode. The following pictures outline the buttons used to add the various formatting styles supported by Mediawiki.
Bullet Lists
Bullet lists helps the author present data in clear and crisp manner, in short sentences. Bullet lists cannot be indented.
Numbered Lists
Decreasing and increasing the indentation is possible for numbered lists
Paragraph Style
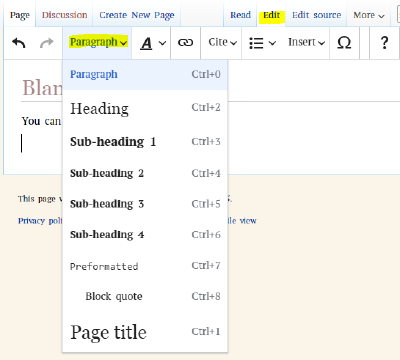
To make headings and subheadings the Paragraph tab has to be accessed. Once the words are in these formats they do not accept the bullet point and numbered lists patterns. For example, Headings cannot be in bullet points.
The drop down list shows the different styles and their visibility on the page when used. Page Title cannot be used in general during the editing process within the page content.
Text Formatting Styles
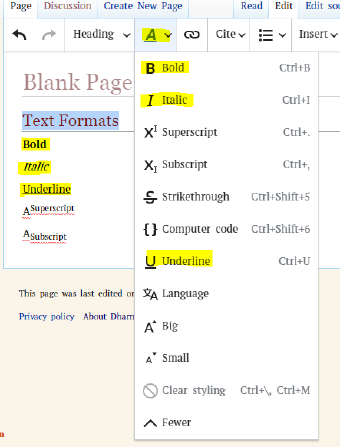
Text formatting tools include the following, a small number of them, as seen in the drop down list. Mostly one would require the Bold and Italic texts for the articles on this portal (to maintain consistency uniformly). Other tools such as Underline, Subscript, Superscript are not used on the site. The font size also is to be maintained normal neither big nor small (with very rare exceptions).
Language
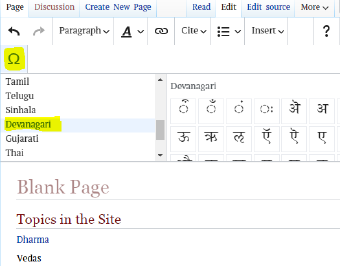
While English is used widely, other languages such as Samskrit language is used for slokas, mantras and phrases as may be required. Editing content in samskrit language can be done either through the keyboard or by clicking on the following symbol and choosing the appropriate language for entering characters. At present transliteration of samskrit slokas and mantras are not facilitated by wiki software. Hence authors have to copy and paste the transliterated slokas from other softwares that offer them.
Linking of Articles
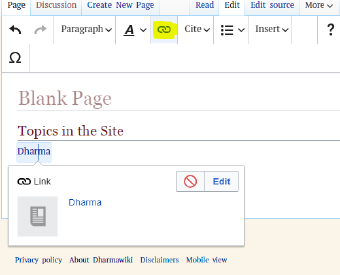
A very good feature about the wiki software is the ability to connect all related topics through the interlinking feature. Articles and topics tend to become big in the process of making them comprehensive. In such instances appropriate parts of the content can be placed in new pages and referred to in other articles through interlinking. The feature is called hyperlinking and can be accessed by clicking on the highlighted sign as below
Once the article is linked it appears blue in color with an underline. On hovering such words a small text box having the link to the new page appears over it, indicating the title of the article.
Flags and Pointers
Wiki offers another important tool to identify the content that needs expansion in various ways. We can place flags that draw the attention of the reader to
- further editing of content (after an author has placed raw data)
- for clarification of a concept (after an author has placed a perspective)
- addition of required references
- addition of more content (when comprehensiveness is required)
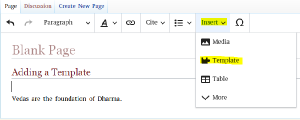
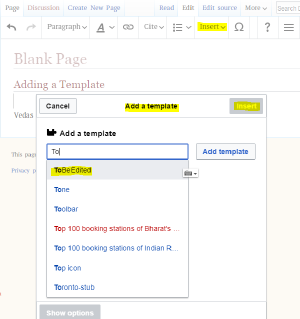
To add each template the procedure is similar and easy. Take the cursor to the top line of the page and click on the Insert button in the formatting tools. In the dropdown list select the Template button. All the names are case sensitive.
Then add the suitable template selected from the drop-down list. Then press on the Insert button.
Examples of few such templates which can be added by author discretion are as follows.
Adding Categories
Adding categories is important for two reasons
- to make your page visible in the readers domain
- to enable sorting to articles
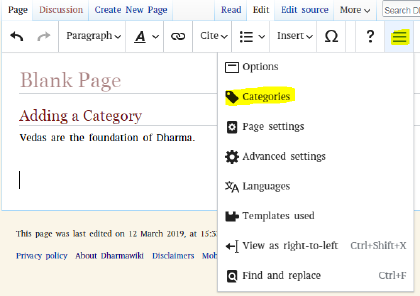
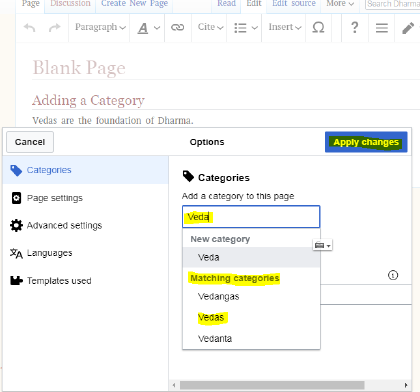
Select the highlighted - three lines - button in the formatting panel. From the drop-down list so obtained select Categories. All the names are case sensitive as well as grammar sensitive. A new window pops up as below. Choose the appropriate category and click on Apply changes to save the category. Repeat the same step to add another category.
More Information
- Guidelines for Authors and Editors
- Content Formatting Policies
- Technical matters
